
How To Sanitize A Sponge
How to Sanitize a Sponge: Keeping Your Kitchen Clean and Bacteria-Free
Sponges are an essential tool in any kitchen, helping us tackle tough messes and grease with ease. However, what many people don't realize is that these handy cleaning aids can quickly become breeding grounds for harmful bacteria if not properly sanitized. In this comprehensive guide, we will delve into the world of sponge sanitization, providing you with expert tips and techniques to keep your sponges clean, odor-free, and free from potentially harmful microbes.
Understanding the Basics of Sponge Sanitization
Before we dive into the various methods of sanitizing a sponge, it's crucial to understand why sponges can harbor bacteria in the first place. Sponges provide the perfect environment for microbial growth due to their porous nature, ability to retain moisture, and exposure to food particles. We will explore the reasons behind bacterial contamination and the potential health risks associated with using unsanitized sponges. Armed with this knowledge, you'll better comprehend the importance of regular sponge sanitization.
Different Methods of Sanitizing a Sponge
In this section, we will explore a range of effective methods to sanitize your sponges. We will start with the conventional hot water and soap method, guiding you through the step-by-step process and highlighting the recommended temperature and duration for optimal sanitization. Additionally, we will discuss the advantages and disadvantages of this method to help you make an informed decision.
Microwaving your sponge is another popular sanitization technique, and we will provide you with a comprehensive guide on how to safely utilize this method. We will address important considerations and precautions to ensure you avoid any potential hazards associated with microwaving sponges. By understanding the pros and cons of this method, you can decide if it's the right approach for you.
For those fortunate enough to have a dishwasher, we will explain how to leverage this appliance for sponge sanitization. Our step-by-step instructions will walk you through the process, including the recommended dishwasher settings and cycle duration. We will also discuss the advantages and disadvantages of using the dishwasher method, allowing you to choose the most suitable approach for your needs.
Some individuals prefer using bleach solutions to sanitize their sponges, and we will provide a detailed guide on this method as well. You will learn how to prepare the bleach solution, the appropriate concentration, and contact time for effective sanitization. Safety precautions and alternatives to bleach will also be discussed, ensuring you have all the information necessary to make an informed decision.
In addition to the aforementioned methods, we will explore alternative approaches to sponge sanitization. These include using vinegar solutions, hydrogen peroxide solutions, steam cleaning, and even UV light exposure. We will delve into the pros and cons of each alternative method, allowing you to choose the one that best fits your preferences and available resources.
Best Practices for Sponge Maintenance and Hygiene
Beyond sanitization, proper sponge maintenance is crucial for long-term hygiene. In this section, we will provide you with best practices for storing your sponges to prevent bacterial growth. We will also discuss the telltale signs that indicate a sponge needs replacement, ensuring you maintain a clean and effective cleaning tool in your kitchen.
Moreover, we will share expert tips on keeping your sponges clean and odor-free. These tips range from regular cleaning routines to specific techniques for removing stubborn stains and unpleasant odors. Additionally, we will discuss alternative options to sponges for specific cleaning tasks, introducing you to innovative and effective substitutes.
Frequently Asked Questions about Sponge Sanitization
As with any topic, there are common questions and concerns surrounding sponge sanitization. In this section, we will address frequently asked questions to provide clarity and dispel any misconceptions. Some of the questions we will cover include:
- Can I reuse a sponge after sanitizing it?
- How long can bacteria survive on a sponge?
- Can I sanitize a sponge that has a scouring pad?
- What if I don't have access to certain sanitization methods?
- Can I use natural or homemade cleaning solutions for sponge sanitization?
- How can I prevent cross-contamination when using a sponge?
- Are there any eco-friendly options for sponge sanitization?
By addressing these questions, we aim to equip you with the knowledge and confidence to maintain a clean and bacteria-free kitchen.
Conclusion
In conclusion, proper sponge sanitization is essential for maintaining a clean and hygienic kitchen environment. By following the techniques and guidelines outlined in this comprehensive guide, you can effectively sanitize your sponges, ensuring they remain effective cleaning tools while minimizing the risk of bacterial contamination. Remember to implement proper sponge maintenance practices and explore alternative options for specific cleaning tasks. With these insights, you can confidently tackle messes in your kitchen, knowing that your sponges are clean, odor-free, and free from harmful bacteria.
Introduction
Sponges are a staple in almost every kitchen, used for a variety of cleaning tasks ranging from washing dishes to wiping countertops. Despite their usefulness, sponges can quickly become a breeding ground for bacteria if not properly sanitized. This can pose a significant risk to your health and the cleanliness of your kitchen. In this comprehensive guide, we will explore the importance of sponge sanitization and provide you with detailed instructions on how to effectively sanitize your sponges using various methods.
A. Importance of Sponge Sanitization
Maintaining a clean and bacteria-free kitchen is essential for ensuring the health and well-being of your household. Sponges, being porous and capable of retaining moisture, can harbor a wide range of potentially harmful bacteria, including E. coli, salmonella, and staphylococcus. These bacteria can multiply rapidly, leading to cross-contamination and an increased risk of foodborne illnesses.
Regularly sanitizing your sponges helps eliminate bacteria and prevents their spread onto surfaces, utensils, and dishes. By incorporating proper sanitization techniques into your cleaning routine, you can significantly reduce the risk of bacterial contamination in your kitchen.
B. Common Misconceptions about Sponge Cleanliness
There are several misconceptions surrounding sponge cleanliness that can lead to inadequate sanitization practices. One common misconception is that rinsing a sponge with water alone is sufficient to remove bacteria. While rinsing can remove some visible debris, it does not effectively eliminate bacteria or sanitize the sponge.
Another misconception is that microwaving a wet sponge for a few seconds is enough to kill bacteria. While microwaving can reduce bacterial contamination, it is not a foolproof method and can even pose a fire hazard if not done correctly.
Understanding these misconceptions is crucial in order to adopt effective sponge sanitization practices and maintain a hygienic kitchen environment.
C. Overview of the Blog Post Content
In this blog post, we will provide you with a comprehensive guide on how to sanitize a sponge effectively. We will start by explaining the basics of sponge sanitization, including why sponges harbor bacteria and the potential health risks associated with using unsanitized sponges.
Next, we will delve into the different methods of sanitizing a sponge, discussing step-by-step instructions, recommended temperatures and durations, and the pros and cons of each method. We will cover popular methods such as using hot water and soap, microwaving, utilizing the dishwasher, and employing bleach solutions. Additionally, we will explore alternative methods, such as vinegar solutions, hydrogen peroxide solutions, steam cleaning, and UV light exposure.
To ensure proper sponge maintenance and hygiene, we will provide you with best practices for storing sponges, signs that indicate a sponge needs replacement, tips for keeping sponges clean and odor-free, and alternative options to sponges for specific cleaning tasks.
Lastly, we will address frequently asked questions about sponge sanitization, clarifying common doubts and providing practical solutions.
By the end of this blog post, you will have a comprehensive understanding of how to effectively sanitize your sponges, enabling you to maintain a clean and bacteria-free kitchen environment.
Understanding the Basics of Sponge Sanitization
Sponges are versatile cleaning tools commonly used in kitchens, but their porous nature makes them susceptible to bacterial growth. To effectively sanitize a sponge, it is important to understand why sponges harbor bacteria and the potential health risks associated with using unsanitized sponges. By familiarizing yourself with these basics, you can grasp the importance of regular sponge sanitization and take appropriate measures to maintain a clean and safe kitchen environment.
A. What is a Sponge?
A sponge is a porous material typically made of cellulose or synthetic materials that are designed to absorb and hold liquids. Its soft and absorbent nature makes it an ideal tool for cleaning various surfaces, dishes, and utensils in the kitchen. Sponges come in different shapes, sizes, and textures, allowing you to choose one that suits your cleaning needs.
B. Why do Sponges Harbor Bacteria?
Sponges provide an ideal environment for bacteria to thrive due to their porous structure. When used for cleaning, sponges come into contact with food particles, grease, and other organic matter that can get trapped within their crevices. The moisture retained by the sponge creates a moist and warm environment, providing the perfect breeding ground for bacteria to multiply rapidly.
The crevices and absorbent nature of sponges make it challenging to thoroughly rinse out all the trapped debris, allowing bacteria to persist and grow. Moreover, the repeated use of sponges without proper sanitization can lead to the accumulation of bacteria over time, further increasing the risk of contamination.
C. Health Risks Associated with Using Unsanitized Sponges
Using unsanitized sponges can pose significant health risks, as they can transfer bacteria to surfaces, utensils, and dishes, which can then contaminate food. Bacteria commonly found in dirty sponges include E. coli, salmonella, and staphylococcus, which can cause foodborne illnesses when ingested.
Foodborne illnesses can result in symptoms such as nausea, vomiting, diarrhea, abdominal pain, and in severe cases, even hospitalization. Individuals with weakened immune systems, children, and the elderly are particularly vulnerable to the harmful effects of bacteria present in dirty sponges.
To prevent the risk of foodborne illnesses and maintain a hygienic kitchen, it is crucial to sanitize your sponges regularly and adopt proper sponge maintenance practices.
D. How Often Should You Sanitize Your Sponge?
The frequency of sponge sanitization depends on several factors, including how frequently you use the sponge and the level of contamination it is exposed to. As a general guideline, it is recommended to sanitize your sponge at least once a week if you use it on a regular basis.
However, if you use the sponge to clean up particularly messy or potentially contaminated areas, such as raw meat or eggs, it is advisable to sanitize it immediately after use. Additionally, if you notice any foul odors, discoloration, or visible signs of mold or mildew on your sponge, it should be sanitized or replaced promptly.
Regularly sanitizing your sponge not only helps eliminate harmful bacteria but also prolongs its lifespan, ensuring it remains an effective and safe tool for your cleaning needs.
Different Methods of Sanitizing a Sponge
Now that we understand the importance of sponge sanitization, it's time to explore the various methods available to effectively sanitize your sponges. Each method has its own advantages and considerations, allowing you to choose the one that best fits your needs and resources. In this section, we will provide you with step-by-step instructions and discuss the pros and cons of each method to help you make an informed decision.
A. Hot Water and Soap Method
The hot water and soap method is a common and straightforward approach to sanitizing sponges. This method utilizes the combination of hot water and soap to physically remove debris and kill bacteria.
To sanitize your sponge using this method, start by thoroughly rinsing the sponge under hot water to remove any loose particles. Next, apply a generous amount of dishwashing soap to the sponge and work it into a lather. Make sure to clean all areas of the sponge, including the crevices and corners. Once the sponge is lathered, rinse it under hot water again to remove the soap and any remaining debris.
While the hot water and soap method is effective in removing visible debris and killing some bacteria, it may not eliminate all types of bacteria that can be found in sponges. Additionally, using this method requires manual effort and may not be suitable for sponges with delicate materials or sponge heads that cannot withstand high temperatures.
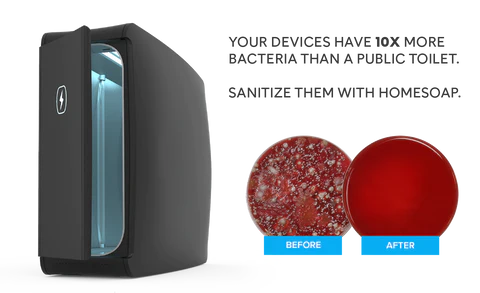
B. Microwave Method
The microwave method is another popular technique for sanitizing sponges. This method utilizes the power of heat to kill bacteria effectively.
To sanitize your sponge using the microwave method, start by dampening the sponge with water to ensure it doesn't catch fire in the microwave. Place the sponge in a microwave-safe dish or a microwave-safe bag and microwave it on high for approximately one to two minutes. The heat generated by the microwave will kill most bacteria present in the sponge.
It is important to exercise caution when using the microwave method. Microwaving a wet sponge can cause it to become extremely hot, so it is advisable to allow the sponge to cool before handling it. Additionally, ensure that the sponge is free from any metal components, as they can cause sparks or damage the microwave.
While the microwave method is convenient and effective in killing bacteria, it may not be suitable for all types of sponges. Certain sponges, especially those with metallic scrubbing pads or plastic components, may not be microwave-safe and can pose a fire hazard. Always check the manufacturer's instructions or labels before attempting to sanitize a sponge in the microwave.
C. Dishwasher Method
If you have a dishwasher, you can take advantage of this appliance to sanitize your sponges. The dishwasher method is an easy and hands-off approach to sponge sanitization.
To sanitize your sponge in the dishwasher, place the sponge in the utensil or cutlery holder of the dishwasher, ensuring it is secure and won't fall to the bottom. Run the dishwasher on a hot cycle, preferably with a heated drying option, to ensure the sponge is exposed to high temperatures for an extended period. The hot water and steam generated by the dishwasher will help kill bacteria and sanitize the sponge effectively.
One of the advantages of using the dishwasher method is that it requires minimal effort on your part. However, it is important to note that not all sponges are dishwasher-safe. Sponges with delicate materials or sponge heads that cannot withstand high temperatures may be damaged in the dishwasher. Always check the manufacturer's instructions or labels to determine if your sponge is dishwasher-safe.
D. Bleach Solution Method
Using a bleach solution is another effective method for sanitizing sponges. Bleach is a powerful disinfectant that can kill a wide range of bacteria and viruses. However, it is important to handle bleach with care and follow proper safety precautions.
To sanitize your sponge using a bleach solution, create a mixture of one part bleach to nine parts water in a container. Immerse the sponge in the bleach solution and allow it to soak for approximately five minutes. After soaking, thoroughly rinse the sponge under running water to remove any residual bleach.
When using a bleach solution, it is crucial to pay attention to the concentration and contact time. Using too much bleach or leaving the sponge in the solution for too long can damage the sponge and pose health risks. Additionally, ensure you are working in a well-ventilated area and avoid mixing bleach with other cleaning products, as it can produce toxic fumes.
While the bleach solution method is effective in killing bacteria, it is not suitable for all types of sponges. Some sponges have materials that can be damaged by bleach or may retain a bleach smell even after rinsing. Always check the manufacturer's instructions or labels to determine if your sponge is bleach-safe.
E. Other Alternative Methods
Apart from the commonly used methods mentioned above, there are alternative approaches to sponge sanitization that you can consider. These methods utilize natural or homemade cleaning solutions and can be effective in reducing bacterial contamination.
-
Vinegar Solution: Vinegar is a natural disinfectant and can help kill bacteria. Create a mixture of equal parts white vinegar and water, and soak the sponge in the solution for at least five minutes. Rinse the sponge thoroughly afterward to remove any vinegar residue.
-
Hydrogen Peroxide Solution: Hydrogen peroxide is another natural disinfectant that can be used to sanitize sponges. Create a mixture of equal parts hydrogen peroxide and water, and soak the sponge in the solution for at least five minutes. Rinse the sponge thoroughly afterward to remove any hydrogen peroxide residue.
-
Steam Cleaning: Steam cleaning is an effective method for killing bacteria and can be used to sanitize sponges. Use a steam cleaner or a steam setting on an iron to steam the sponge for a few minutes. The heat generated by the steam will help kill bacteria present in the sponge.
-
UV Light Exposure: UV light has germicidal properties and can be used to sanitize sponges. Place the sponge in direct sunlight for a few hours to allow the UV rays to kill bacteria. However, this method may not be as effective as others, especially if the sponge is thick or has multiple layers.
Each alternative method has its own advantages and considerations. It is important to assess the suitability of these methods based on your specific needs and resources.
With the knowledge of these different sponge sanitization methods, you can choose the approach that best suits your preferences and available resources. Remember to consider the pros and cons of each method and always prioritize safety when handling cleaning solutions or using appliances. By regularly sanitizing your sponges using the appropriate methods, you can ensure a clean and bacteria-free kitchen environment.
Best Practices for Sponge Maintenance and Hygiene
In addition to regular sponge sanitization, implementing proper maintenance and hygiene practices is crucial to ensure the longevity and effectiveness of your sponges. By following these best practices, you can maintain clean and odor-free sponges while minimizing the risk of bacterial contamination in your kitchen.
A. Proper Storage of Sponges to Prevent Bacterial Growth
One of the key aspects of sponge maintenance is proper storage. Storing your sponges correctly helps prevent the growth of bacteria and prolongs their usefulness. Here are some tips for storing your sponges:
-
Allow sponges to dry: After each use, rinse your sponge thoroughly and wring out any excess water. Place the sponge in a well-ventilated area to air dry completely before storing it. Avoid placing damp sponges in closed containers or areas where they cannot dry properly, as this promotes bacterial growth.
-
Keep sponges away from high-moisture areas: Avoid storing sponges near sinks or areas where they may come into contact with excessive moisture. Moisture-rich environments can accelerate bacterial growth and lead to unpleasant odors. Instead, store your sponges in a dry location to maintain their freshness.
-
Use sponge holders or racks: Invest in sponge holders or racks that allow proper airflow around the sponge. These holders help elevate the sponge and prevent it from sitting in pooled water, reducing the chances of bacterial growth.
By implementing these storage practices, you can minimize the risk of bacterial contamination and ensure that your sponges remain clean and ready for use.
B. Signs of a Sponge that Needs Replacement
Sponges have a limited lifespan and will eventually need to be replaced. Using a sponge past its prime can result in ineffective cleaning and increased bacterial contamination. Here are some signs that indicate a sponge needs replacement:
-
Foul odor: If your sponge emits a persistent foul odor, even after proper cleaning and sanitization, it may be a sign that it is time to replace it. Lingering odors can indicate the presence of deep-seated bacteria that cannot be eliminated.
-
Discoloration: Sponges that have developed noticeable discoloration, such as dark spots or stains, may have accumulated bacteria and debris. Discoloration is a visual indication that the sponge is no longer hygienic and should be replaced.
-
Mold or mildew growth: Mold or mildew growth on a sponge is a clear sign of excessive bacterial contamination. If you notice fuzzy patches or black spots on your sponge, it is essential to discard it immediately and replace it with a new one.
-
Degraded texture or falling apart: Over time, sponges can start to lose their shape, become brittle, or develop tears and holes. These physical changes not only affect the sponge's effectiveness but also provide additional hiding places for bacteria. If your sponge is falling apart or no longer holds its shape, it is time to invest in a new one.
By paying attention to these signs, you can ensure that you are using sponges that are clean, effective, and free from excessive bacterial contamination.
C. Tips for Keeping Sponges Clean and Odor-Free
To maintain clean and odor-free sponges, consider implementing the following tips:
-
Rinse after each use: After using your sponge, rinse it thoroughly under hot water to remove any food particles or debris. Squeezing the sponge while rinsing helps dislodge trapped debris and flush it out.
-
Use soap or detergent: For extra cleanliness, apply a small amount of dishwashing soap or detergent to the sponge while rinsing. Gently squeeze and massage the sponge to work the soap into the fibers, ensuring a thorough clean.
-
Disinfect regularly: In addition to regular sanitization, disinfect your sponge by soaking it in a bleach solution or vinegar solution periodically. This helps eliminate any remaining bacteria and keeps your sponge fresh.
-
Avoid using sponges on hot surfaces: Hot surfaces can melt or damage the sponge, making it less effective and more prone to bacterial growth. Use heat-resistant materials or tools for cleaning hot surfaces to avoid damaging your sponge.
-
Avoid using sponges for prolonged periods: Continuous use of a single sponge for an extended period can lead to bacterial buildup and degradation. Consider rotating your sponges or using different sponges for specific cleaning tasks to prevent excessive wear and tear.
D. Regular Cleaning Routines to Maintain Sponge Hygiene
Establishing a regular cleaning routine for your sponges helps ensure ongoing hygiene and effectiveness. Here are some cleaning routines to consider:
-
Daily cleaning: Rinse your sponge thoroughly after each use, squeezing out excess water and debris. Allow it to air dry completely before storing.
-
Weekly sanitization: Sanitize your sponge using one of the methods discussed in this blog post, such as hot water and soap, microwave, dishwasher, or bleach solution. Choose a method that suits your preferences and resources, and incorporate it into your weekly cleaning routine.
-
Monthly deep cleaning: Once a month, perform a deep clean of your sponges using alternative methods mentioned earlier, such as vinegar solutions, hydrogen peroxide solutions, steam cleaning, or UV light exposure. These methods can provide an extra level of sanitization and help remove any deep-seated bacteria.
By incorporating these cleaning routines into your regular maintenance practices, you can ensure that your sponges remain clean, odor-free, and effective in tackling your kitchen cleaning tasks.
E. Alternative Options to Sponges for Specific Tasks
While sponges are commonly used for various cleaning tasks, there are alternative options available for specific cleaning needs. Consider the following alternatives:
-
Microfiber cloths: Microfiber cloths are highly absorbent and effective at capturing dirt and debris. They are particularly suitable for dusting, wiping countertops, and cleaning glass surfaces. Microfiber cloths can be reused multiple times and can be washed and sanitized easily.
-
Brushes: Brushes with nylon or natural bristles are excellent for scrubbing dishes, pots, and pans. They provide more scrubbing power and can reach into tight corners and crevices. Brushes can be easily cleaned and sanitized, making them a hygienic alternative to sponges.
-
Disposable wipes: Disposable wipes are convenient and hygienic options for quick and easy cleaning. They come pre-moistened with cleaning agents and can be used for wiping surfaces, spills, and general cleaning. However, keep in mind the environmental impact of disposable wipes and opt for eco-friendly options if available.
Choosing the right alternative option depends on your specific cleaning needs and preferences. Incorporating these alternatives into your cleaning routine can help reduce the reliance on sponges and provide additional options for maintaining a clean and hygienic kitchen.
By following these best practices for sponge maintenance and hygiene, you can ensure that your sponges remain clean, odor-free, and effective for your cleaning needs. Implementing proper storage, recognizing signs of sponge replacement, adopting regular cleaning routines, and exploring alternative options will contribute to a cleaner and healthier kitchen environment.
Frequently Asked Questions about Sponge Sanitization
As with any topic, there are common questions and concerns surrounding sponge sanitization. In this section, we will address frequently asked questions to provide clarity and address any lingering doubts you may have. By addressing these questions, we aim to further enhance your understanding of sponge sanitization and help you make informed decisions for maintaining a clean and bacteria-free kitchen.
A. Can I reuse a sponge after sanitizing it?
Yes, you can reuse a sponge after sanitizing it, provided that it is in good condition. Properly sanitizing a sponge helps eliminate bacteria and reduces the risk of contamination. However, it is important to regularly monitor the condition of your sponge. If it shows signs of wear and tear, such as fraying, tearing, or a deteriorated texture, it is best to replace it with a new one. Reusing a worn-out sponge can be less effective in cleaning and may increase the risk of bacterial growth and cross-contamination.
B. How long can bacteria survive on a sponge?
Bacteria can survive on a sponge for varying lengths of time, depending on environmental conditions and the type of bacteria. Studies have shown that some bacteria, such as E. coli and salmonella, can survive on a damp sponge for several hours to several days. To minimize the risk of bacterial growth, it is crucial to regularly sanitize your sponge and allow it to dry thoroughly after each use.
C. Can I sanitize a sponge that has a scouring pad?
Yes, you can sanitize a sponge that has a scouring pad. The sanitization methods discussed earlier, such as hot water and soap, microwaving, dishwasher, and bleach solution, can all be used for sponges with scouring pads. However, it is important to take extra care when sanitizing sponges with scouring pads to avoid damaging the pad or any metallic components. Always follow the manufacturer's instructions and guidelines for sanitizing sponges with additional features.
D. What if I don't have access to certain sanitization methods?
If you don't have access to certain sanitization methods, such as a microwave or dishwasher, there are alternative methods you can consider. Some of these alternative methods include using vinegar solutions, hydrogen peroxide solutions, steam cleaning, or exposing the sponge to UV light. These methods, discussed earlier in the blog post, can provide effective sanitization options that do not require specialized equipment. Choose the method that best suits your resources and preferences.
E. Can I use natural or homemade cleaning solutions for sponge sanitization?
Yes, you can use natural or homemade cleaning solutions for sponge sanitization. Natural cleaning solutions, such as vinegar and hydrogen peroxide solutions, are effective in killing bacteria and can be used to sanitize sponges. Vinegar acts as a natural disinfectant, and hydrogen peroxide has antimicrobial properties. When using these solutions, ensure proper dilution and follow the recommended soaking times to achieve effective sanitization. Additionally, always rinse the sponge thoroughly after sanitization to remove any residual solution.
F. How can I prevent cross-contamination when using a sponge?
Cross-contamination can occur when bacteria from a contaminated sponge are transferred to other surfaces, utensils, or dishes. To prevent cross-contamination, follow these guidelines:
-
Use separate sponges for different cleaning tasks: Assign specific sponges for different purposes, such as one for dishes, one for countertops, and another for cleaning appliances. This reduces the risk of transferring bacteria from one area to another.
-
Clean and sanitize sponges regularly: Regularly cleaning and sanitizing your sponges helps eliminate bacteria and reduce the risk of cross-contamination. By maintaining a clean sponge, you minimize the chances of spreading bacteria to other surfaces.
-
Wash your hands frequently: Proper hand hygiene is essential in preventing cross-contamination. Wash your hands before and after handling sponges, especially when moving from one cleaning task to another or before handling food.
-
Avoid using sponges on high-risk areas: To minimize the risk of cross-contamination, avoid using sponges on high-risk areas, such as cutting boards used for raw meat or areas where raw eggs have been cracked. Use disposable disinfecting wipes or paper towels instead.
By following these preventive measures, you can reduce the risk of cross-contamination and maintain a hygienic kitchen environment.
G. Are there any eco-friendly options for sponge sanitization?
Yes, there are eco-friendly options for sponge sanitization. Using natural cleaning solutions, such as vinegar or hydrogen peroxide, is an eco-friendly alternative to chemical-based sanitizers. Additionally, you can opt for reusable and biodegradable sponges made from natural materials, such as cellulose or plant-based fibers. These sponges are designed to be more environmentally friendly and can be sanitized using the methods discussed in this blog post. By choosing eco-friendly options, you can maintain a clean and bacteria-free kitchen while minimizing your environmental impact.
By addressing these frequently asked questions, we aim to provide you with a comprehensive understanding of sponge sanitization and address any concerns you may have. If you have any further questions or doubts, please feel free to reach out for clarification.
Conclusion
In conclusion, maintaining a clean and bacteria-free kitchen is of utmost importance for the health and well-being of your household. Proper sponge sanitization is a key aspect of achieving this goal. By following the methods and best practices outlined in this comprehensive guide, you can effectively sanitize your sponges and ensure a hygienic kitchen environment.
We started by understanding the basics of sponge sanitization, exploring why sponges harbor bacteria and the potential health risks associated with using unsanitized sponges. Armed with this knowledge, you now understand the importance of regular sponge sanitization and the need to adopt proper maintenance practices.
We then delved into the different methods of sanitizing a sponge, providing step-by-step instructions and discussing the pros and cons of each method. Whether you choose the hot water and soap method, microwave method, dishwasher method, bleach solution method, or alternative methods like vinegar solutions or steam cleaning, each method offers effective sanitization options to suit your needs and resources.
Additionally, we discussed best practices for sponge maintenance and hygiene, emphasizing the importance of proper storage, recognizing signs of sponge replacement, and implementing regular cleaning routines. By following these practices, you can prolong the lifespan of your sponges, maintain their cleanliness, and minimize the risk of bacterial contamination.
We also addressed frequently asked questions about sponge sanitization, clearing any doubts you may have had. From reusing sanitized sponges to preventing cross-contamination and exploring eco-friendly options, we aimed to provide comprehensive answers to ensure you have the necessary knowledge to maintain a clean and bacteria-free kitchen.
In conclusion, by incorporating proper sponge sanitization techniques, maintaining good hygiene practices, and considering alternative options for specific cleaning tasks, you can confidently tackle messes in your kitchen, knowing that your sponges are clean, odor-free, and free from harmful bacteria.
Remember, regular sponge sanitization is not only crucial for your health and safety but also for the longevity and effectiveness of your sponges. By adopting the methods and best practices outlined in this guide, you can maintain a hygienic kitchen environment that promotes cleanliness, health, and well-being.
Now it's time to put your newfound knowledge into action. Go forth and sanitize your sponges, and enjoy a clean, fresh, and bacteria-free kitchen!
Effective Communication and Order Management
In today's fast-paced world, effective communication and efficient order management are essential for running a successful business. Whether you are a small business owner, an entrepreneur, or an employee in a larger organization, mastering these skills can significantly improve your productivity, customer satisfaction, and overall success.
A. Importance of Effective Communication
Effective communication is the cornerstone of any successful business. It involves the clear and concise exchange of information between individuals or teams to achieve common goals. Here are some reasons why effective communication is crucial:
-
Clarity and understanding: Effective communication ensures that messages are conveyed accurately, minimizing misunderstandings and confusion. It helps to eliminate ambiguity and allows everyone involved to have a clear understanding of expectations, tasks, and objectives.
-
Collaboration and teamwork: Good communication fosters collaboration and teamwork within an organization. When team members can communicate their ideas, concerns, and opinions openly, it leads to better problem-solving, innovation, and overall productivity.
-
Customer satisfaction: Clear and effective communication with customers is vital for building strong relationships and ensuring customer satisfaction. When customers feel heard, understood, and valued, they are more likely to remain loyal and recommend your products or services to others.
-
Conflict resolution: Effective communication is crucial for resolving conflicts and addressing issues that may arise within a team or between individuals. Open and honest communication allows for the identification of problems, the exploration of different viewpoints, and the finding of mutually beneficial solutions.
To enhance communication within your business, consider implementing practices such as active listening, using clear and concise language, utilizing various communication channels (e.g., face-to-face, email, phone), and encouraging feedback and open dialogue.
B. Importance of Efficient Order Management
Efficient order management is essential for businesses that deal with product orders, inventory management, and customer fulfillment. Here's why it is important:
-
Customer satisfaction: Efficient order management ensures that customer orders are processed accurately and promptly. This leads to improved customer satisfaction, as customers receive their orders in a timely manner without errors or delays.
-
Inventory control: Effective order management allows businesses to track and manage their inventory efficiently. By keeping track of stock levels, monitoring demand, and having a streamlined order fulfillment process, businesses can avoid stockouts, reduce carrying costs, and optimize their inventory levels.
-
Streamlined operations: Efficient order management helps businesses streamline their operations and reduce unnecessary costs and inefficiencies. By automating processes, eliminating manual errors, and optimizing fulfillment workflows, businesses can save time and resources, allowing them to focus on core activities and growth.
-
Scalability and growth: With efficient order management systems in place, businesses can scale their operations and handle increased order volumes without compromising accuracy or customer satisfaction. This is particularly important for businesses that experience growth or seasonal fluctuations in demand.
To improve order management efficiency, businesses can consider implementing order management software, integrating systems to automate processes, utilizing barcode scanning technology for inventory control, and regularly analyzing and optimizing order fulfillment workflows.
C. Effective Communication in Order Management
Effective communication plays a crucial role in order management. It ensures that all parties involved, including customers, suppliers, and internal teams, are on the same page and have a clear understanding of order requirements, timelines, and expectations. Here are some key aspects of effective communication in order management:
-
Clear order instructions: When placing orders, it is important to communicate clear instructions to suppliers or team members responsible for order fulfillment. Clearly outline product specifications, quantities, delivery dates, and any other relevant details to avoid misunderstandings or mistakes.
-
Timely updates and notifications: Throughout the order fulfillment process, communicate timely updates and notifications to all stakeholders involved. This can include order confirmations, shipment tracking information, and delivery notifications. Keeping everyone informed helps manage expectations and provides transparency.
-
Proactive issue resolution: In the event of any issues or delays with an order, effective communication is crucial for proactive issue resolution. Promptly communicate any challenges to the relevant parties, provide alternative solutions if possible, and keep customers informed of the progress and resolution timelines.
-
Feedback and continuous improvement: Communication should not be limited to order placement and fulfillment. Encourage customers to provide feedback on their ordering experience and use that feedback to continuously improve your order management processes. Similarly, seek feedback from internal teams involved in order fulfillment to identify areas for improvement and optimize workflows.
By prioritizing effective communication in order management, businesses can avoid miscommunication, improve customer satisfaction, and optimize their overall order fulfillment processes.
D. Order Management Best Practices
To ensure efficient order management, businesses should implement the following best practices:
-
Centralized order management system: Utilize a centralized order management system or software that integrates with other business systems, such as inventory management and customer relationship management (CRM). This allows for real-time visibility of orders, inventory levels, and customer information, streamlining the order fulfillment process.
-
Standardized order processing workflows: Establish standardized workflows and processes for order processing, including order entry, validation, fulfillment, and shipping. This ensures consistency and reduces the chances of errors or delays.
-
Real-time inventory tracking: Implement a system that provides real-time visibility of inventory levels to ensure accurate order fulfillment. This helps prevent stockouts and allows for proactive inventory replenishment planning.
-
Automation and integration: Leverage automation and system integration wherever possible to minimize manual errors, reduce processing time, and improve overall efficiency. This can include automated order confirmation emails, barcode scanning for inventory management, and integration with shipping carriers for seamless shipment tracking.
-
Performance monitoring and analytics: Regularly monitor order management performance metrics, such as order cycle time, fulfillment accuracy, and customer satisfaction. Utilize analytics to identify bottlenecks, areas for improvement, and opportunities for increased efficiency.
By implementing these best practices, businesses can streamline their order management processes, enhance customer satisfaction, and position themselves for growth and success.
In conclusion, effective communication and efficient order management are integral to the success of any business. By prioritizing communication, businesses can foster collaboration, minimize misunderstandings, and improve customer satisfaction. Efficient order management, on the other hand, ensures timely and accurate order fulfillment, optimized inventory control, and streamlined operations. By implementing best practices in effective communication and order management, businesses can enhance their overall performance, customer relationships, and competitiveness in the market.

